2D Graphics With pyglet and OpenGL

pyglet is a cross-platform library that exposes Python bindings for OpenGL, and also provides a bunch of functionality layered on top of that, such as displaying text and images, mouse and keyboard events, and playing multimedia. I'd characterise it as a leaner alternative to PyGame.
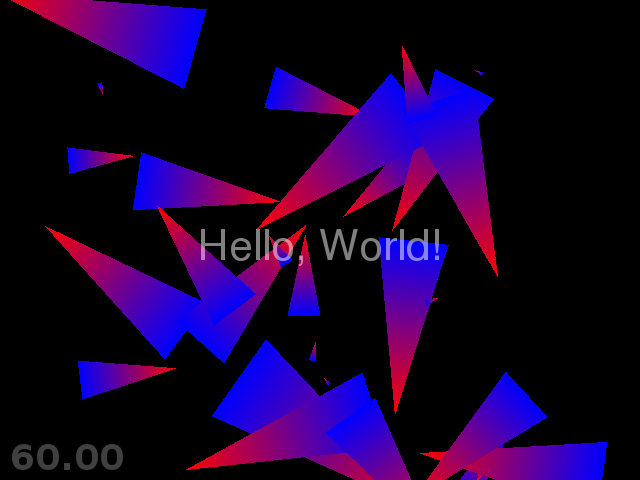
I worked my way through pyglet's introductory example code, and was impressed enough to want to try it out with some of my own code, so I knocked together the following elementary 2D graphics demo.
Of particular note - it's a deliberate design goal of pyglet that it needs no other dependencies. After installing it, the following script 'just worked' on both my home Linux lappy and my work Windows desktop, and adopts sensible default behaviour across multiple monitors. Also, the resulting code is cleaner and less verbose than equivalent demos I've created in the past using PyGame.
App class (the controller)
The App(lication) class creates our other objects, and then runs the main animation loop. The window and clock modules are pyglet's - everything else will be our own classes:
- World class manages a collection of in-game entities. The world.tick() method updates the position or orientation of these entities.
- Camera class initialises OpenGL and defines projections that map from our in-world co-ordinates to pixels on-screen.
- Hud class defines text we draw on the screen overlaid on top of the world, such as a frames-per-second (fps) counter.
Note how in the main loop, we ask our camera class to set two different projections - one 'worldProjection', after which we draw in-game entities which are offset and rotated depending on the position of the camera, followed by a 'hudProjection', for drawing things that should be drawn in the style of a 'heads-up display', ie. always aligned with the screen, like text messages and frames-per-second (fps) counters.
class App(object):

    def __init__(self):
        self.world = World()
        self.win = window.Window(fullscreen=True, vsync=True)
        self.camera = Camera(self.win, zoom=100.0)
        self.hud = Hud(self.win)
        clock.set_fps_limit(60)

    def mainLoop(self):
        while not self.win.has_exit:
            self.win.dispatch_events()

            self.world.tick()

            self.camera.worldProjection()
            self.world.draw()

            self.camera.hudProjection()
            self.hud.draw()

            clock.tick()
            self.win.flip()

app = App()
app.mainLoop()
World class (the model)
The world class is just a container for a collection of in-game Entities. It uses pyglet's clock.schedule_interval() method to spawn a new Entity object at a random location every 0.25 seconds.
Every time world.tick() is called, we simply rotate each Entity by an amount dependent on its size.
Drawing the world merely clears the output buffer, resets the modelview matrix, and then asks each Entity to draw itself.
class World(object):

    def __init__(self):
        self.ents = {}
        self.nextEntId = 0
        clock.schedule_interval(self.spawn, 0.25)

    def spawnEntity(self, dt):
        size = uniform(1.0, 100.0)
        x = uniform(-100.0, 100.0)
        y = uniform(-100.0, 100.0)
        rot = uniform(0.0, 360.0)
        ent = Entity(self.nextEntId, size, x, y, rot)
        self.ents[ent.id] = ent
        self.nextEntId += 1
        return ent

    def tick(self):
        for ent in self.ents.values():
            ent.rot += 10.0 / ent.size

    def draw(self):
        glClear(GL_COLOR_BUFFER_BIT)
        glMatrixMode(GL_MODELVIEW);
        glLoadIdentity();
        for ent in self.ents.values():
            ent.draw()
Entity class
Each entity knows its own location, orientation and size in world-space. It also knows how to draw itself, using a series of OpenGL calls. For now, I just draw a triangle for each entity, pointing along its orientation.
class Entity(object):

    def __init__(self, id, size, x, y, rot):
        self.id = id
        self.size = size
        self.x = x
        self.y = y
        self.rot = rot

    def draw(self):
        glLoadIdentity()
        glTranslatef(self.x, self.y, 0.0)
        glRotatef(self.rot, 0, 0, 1)
        glScalef(self.size, self.size, 1.0)
        glBegin(GL_TRIANGLES)
        glColor4f(1.0, 0.0, 0.0, 0.0)
        glVertex2f(0.0, 0.5)
        glColor4f(0.0, 0.0, 1.0, 1.0)
        glVertex2f(0.2, -0.5)
        glColor4f(0.0, 0.0, 1.0, 1.0)
        glVertex2f(-0.2, -0.5)
        glEnd()
Camera class (the view)
The camera class sets the OpenGL projections required to either draw in-game entities, or else HUD-style on-screen displays. In future enhancements, the camera's worldProjection mode will not just look at worldspace co-ordinates (0, 0), but will be able to roam around the world, and rotate.
Note that the widthRatio calculated in worldProjection() will do an
integer division by default. To fix it, I imported real division (ie.
from __future__ import division)
class Camera(object):

    def __init__(self, win, zoom=1.0):
        self.win = win
        self.zoom = zoom

    def worldProjection(self):
        glMatrixMode(GL_PROJECTION)
        glLoadIdentity()
        widthRatio = self.win.width / self.win.height
        gluOrtho2D(
            -self.zoom * widthRatio,
            self.zoom * widthRatio,
            -self.zoom,
            self.zoom)

    def hudProjection(self):
        glMatrixMode(GL_PROJECTION)
        glLoadIdentity()
        gluOrtho2D(0, self.win.width, 0, self.win.height)
Hud class (also part of the view)
The Hud class initialises the text string 'Hello, World!', and creates an fps counter. The draw() method renders both these to the screen. It is worth noting that pyglet handles text like this smartly, rasterising the Text object to a bitmap when it is first created, and then rapidly drawing that to the screen using a textured quad in the draw() method.
class Hud(object):

    def __init__(self, win):
        helv = font.load('Helvetica', win.width / 15.0)
        self.text = font.Text(
            helv,
            'Hello, World!',
            x=win.width / 2,
            y=win.height / 2,
            halign=font.Text.CENTER,
            valign=font.Text.CENTER,
            color=(1, 1, 1, 0.5),
        )
        self.fps = clock.ClockDisplay()

    def draw(self):
        glMatrixMode(GL_MODELVIEW);
        glLoadIdentity();
        self.text.draw()
        self.fps.draw()
The Payoff

This is reasonably pleasing for a first stab. It runs at 60 frames per second, adding a new triangle to the screen every 0.25 seconds, and rotating them all gently. After about 100 triangles, it starts to slow down, but there are lots of things we can do to optimise it yet. In particular, I'm hoping that each triangle could be replaced by a complex geometry without any slowdow, by passing arrays of vertices to OpenGL, none of which need be touched by our code at all.
On to Part 2: Better Vertex Throughput...
 gameloop.py.zip